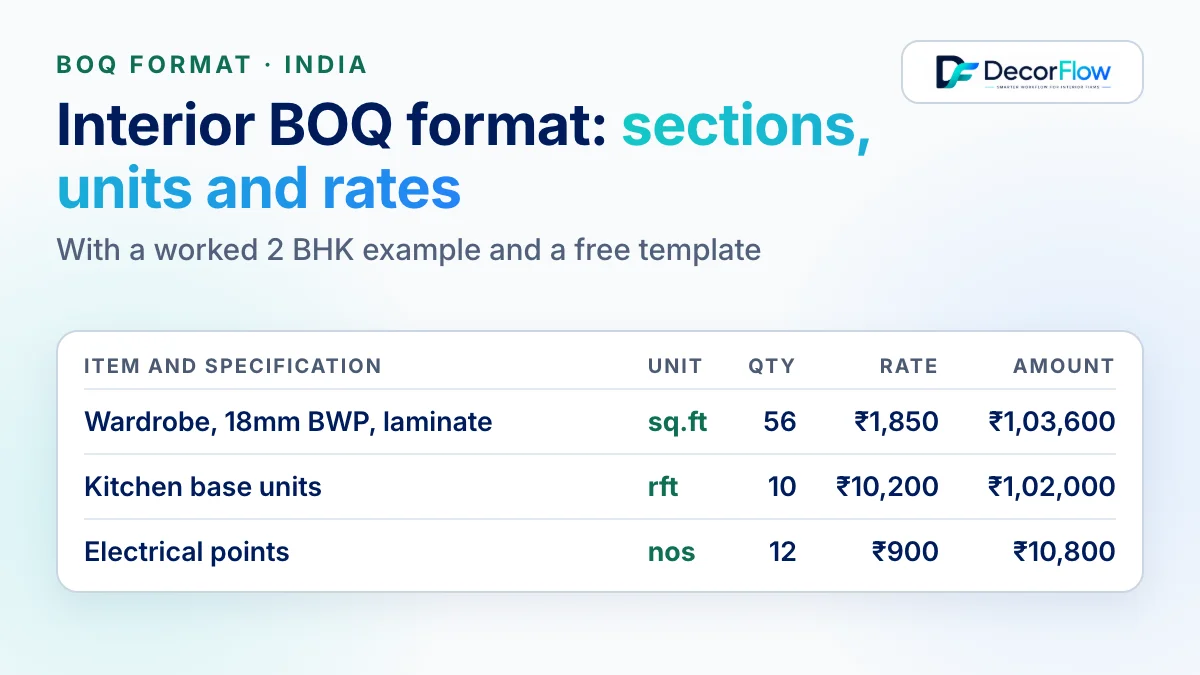

Your BOQ says "Wardrobe, 18mm BWP carcass, 1mm laminate shutters, 8' × 7', 56 sq.ft". Your plywood dealer does not sell square feet of wardrobe. He sells 8' × 4' sheets, by thickness. The laminate supplier sells sheets by shade, the hardware shop sells hinges by the piece and edge band comes by the metre. Somebody has to translate one into the other, and on most sites that somebody is the carpenter, on the day, over the phone.
That translation is the material take-off. Done properly it takes about fifteen minutes per assembly: break the item into panels, add up the area for each thickness, add a wastage allowance, round up to whole sheets, check the count against a cutting layout, then list the laminate, edge band and hardware that go with it. Finally, give every material an order-by date worked back from the day the site needs it. This guide walks through each step with two wardrobes from a 2 BHK, and every number is checked.
Why a BOQ quantity is not an order quantity
A BOQ is priced in the units a client can check: square feet of wardrobe face, running feet of kitchen, numbers of electrical points. Vendors sell in the units they stock. Some BOQ lines map straight across. Others hide several materials, each sold in its own unit.
| BOQ line and unit | What you actually order | Unit you order in |
|---|---|---|
| Wardrobe, TV unit, wall panelling (sq.ft of face) | Ply by thickness, decorative laminate, liner, edge band, hinges, handles, accessories | Sheets, metres, nos |
| Kitchen base and wall units (rft) | Carcass ply, shutter boards, laminate or acrylic, edge band, hinges, channels | Sheets, metres, nos, sets |
| Tandem drawer set (set) | The same set | Sets: order as written |
| Quartz countertop (rft) | Slab or fabricated top, depending on the fabricator | Ask the fabricator; usually measured on site |
| Painting (sq.ft) | Putty, primer, emulsion | Kg or litres, from the coverage on the product label |
| Debris removal (LS) | Nothing to order | Service only |
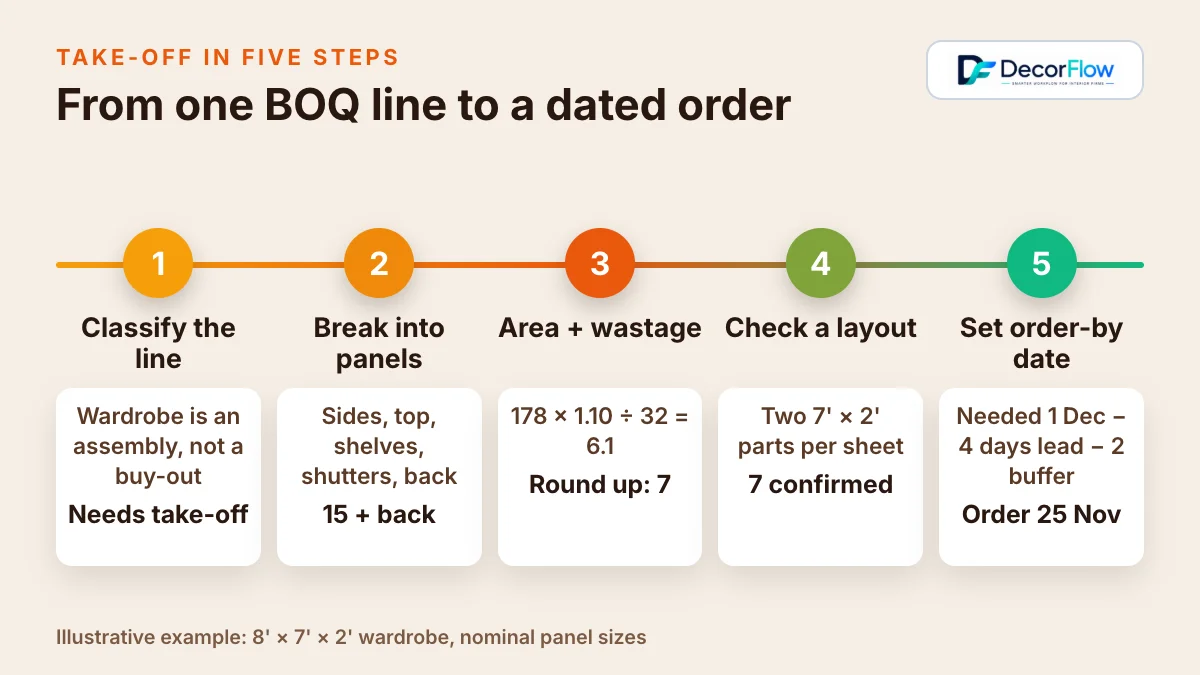
Step 1: Sort every BOQ line into four buckets
Before calculating anything, go down the BOQ and decide what each line means for purchasing. Four buckets cover almost every interior line:
| Bucket | What it means | Examples from the 2 BHK BOQ |
|---|---|---|
| Direct material | Order exactly what the line says, in the line's unit | Tandem drawer sets (4 sets) |
| Assembly needing take-off | Built on site or in a workshop from several materials; needs breaking down | Wardrobes, TV unit, wall panelling, study table, kitchen units |
| Service or labour only | Nothing to buy, or the contractor supplies everything | Debris removal, deep cleaning, floor protection |
| Excluded or client supplied | Never goes on a purchase order | Sofa and dining set (client supplied) |
Only the second bucket needs real work. Note too which contractors supply their own material. A false ceiling or painting contractor quoting "with material" makes those lines service-only for your purchase team, even though material is being used on site.
Step 2: Break each assembly into panels
Take the master bedroom wardrobe: 8' wide, 7' high, 2' deep, with one vertical partition making two 4' bays, six shelves and four 2' × 7' shutters. Carcass, shelves and shutters are 18mm BWP ply; the back is 6mm ply. Write out each panel, how many there are, and its size:
| Panel | Pieces | Size | Area (sq.ft) | Thickness |
|---|---|---|---|---|
| Side panels | 2 | 7' × 2' | 28 | 18mm |
| Top and bottom | 2 | 8' × 2' | 32 | 18mm |
| Partition | 1 | 7' × 2' | 14 | 18mm |
| Shelves | 6 | 4' × 2' | 48 | 18mm |
| Shutters | 4 | 2' × 7' | 56 | 18mm |
| Total 18mm | 15 | — | 178 | — |
| Back panel | 1 | 8' × 7' | 56 | 6mm |
Step 3: Area by thickness, plus wastage, rounded up to sheets
A standard Indian ply sheet is 8' × 4', or 32 sq.ft. Keep each thickness separate, because 18mm and 6mm are different products on the order.
There is no standard wastage figure. Plywood makers' own guides differ: Greenply suggests adding 5–10% for cuts and wastage, while Royale Touche suggests 10–15% for wardrobes. This example uses 10%. The better number is your own: compare sheets ordered with sheets used on your last few wardrobes and use that.
Check the count against a cutting layout
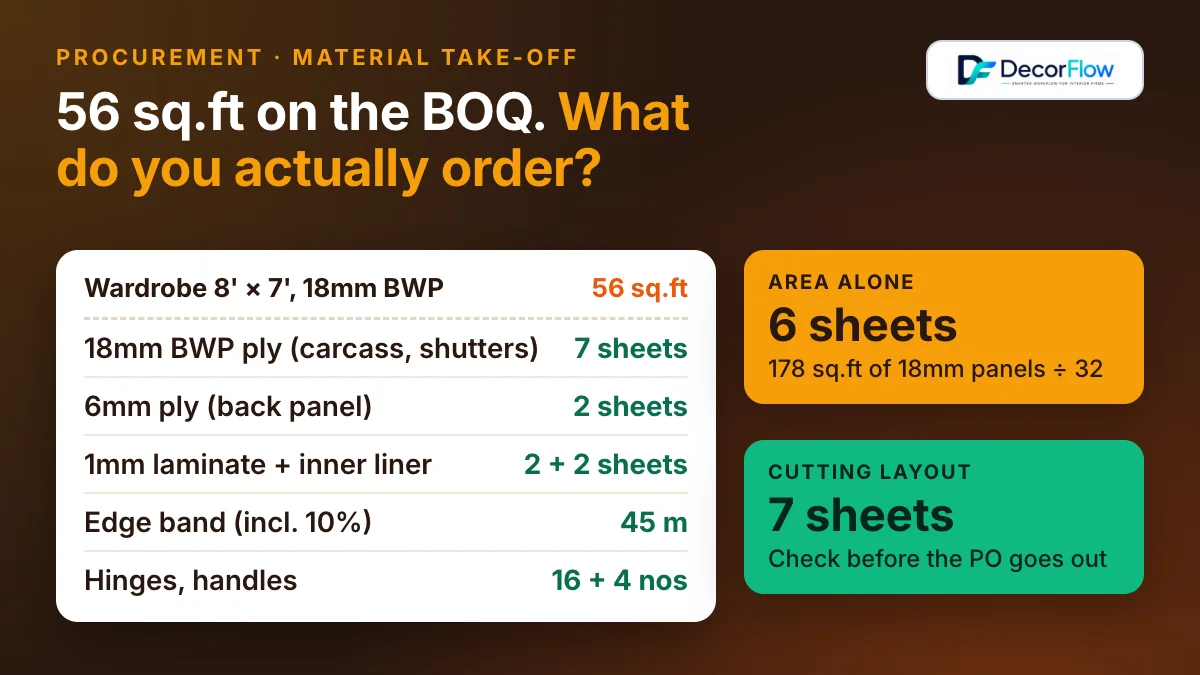
The area formula assumes panels can be cut from sheets like water poured into glasses. They cannot. Without the wastage allowance, 178 ÷ 32 = 5.56, which rounds up to 6. But seven of this wardrobe's panels are 7' long, and an 8' × 4' sheet fits only two of them, leaving a 1' strip that is too narrow to be useful. Lay the panels out and you need 7 sheets.
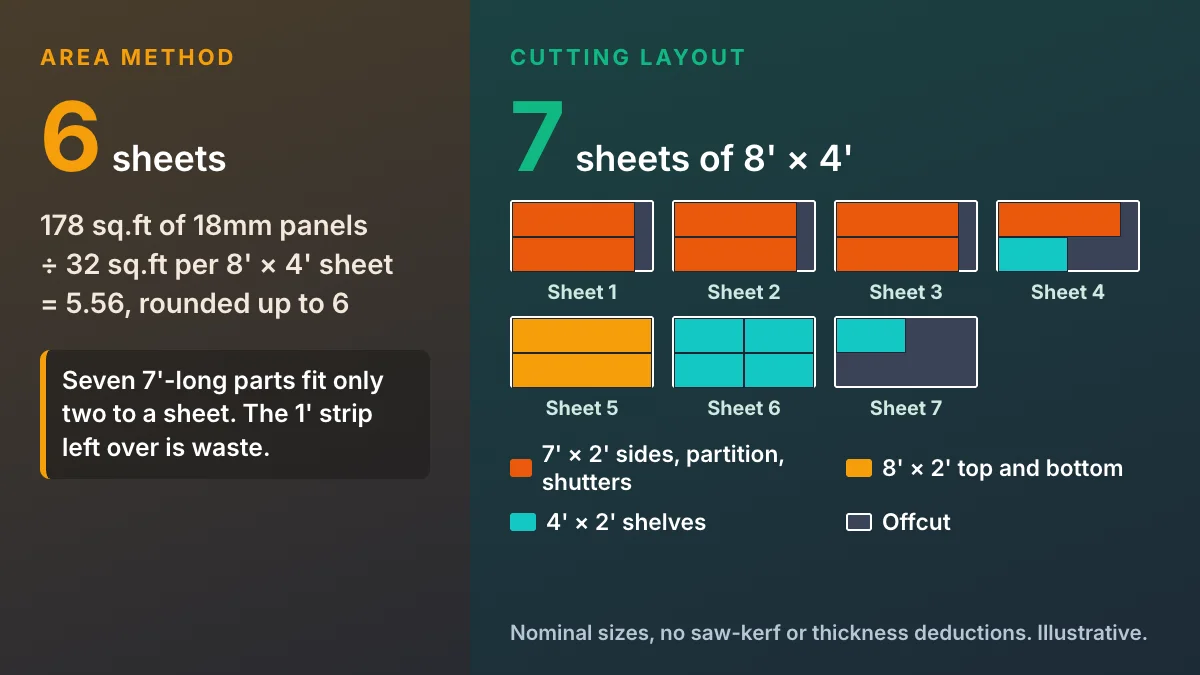
Here the 10% allowance happened to land on the right answer. It does not always. The smaller 6' × 7' wardrobe in Bedroom 2 has 144 sq.ft of 18mm panels: 144 × 1.10 ÷ 32 = 4.95, so 5 sheets, and a layout also needs exactly 5. That leaves no spare sheet for a mis-cut. A rough layout on graph paper or in a cut-list tool takes ten minutes, and it is cheaper than a second tempo trip for one sheet.
Step 4: Laminate, edge band and hardware
Ply gets counted because it is the big-ticket item. These are the lines that get forgotten, then bought at retail rate from the nearest shop when the carpenter runs out.
Decorative laminate: count by layout too. Two 2' × 7' shutter faces fit on one 8' × 4' sheet, so four shutters need 2 sheets. Add exposed end panels and loft shutters if the design has them.
Liner: most carpenters press a liner on the inside face of a laminated shutter so it does not bow. Same count as the decorative laminate: 2 sheets. If the carcass interior is lined rather than pre-laminated, count those faces as well; they are often the largest laminate quantity on the job.
Edge band: add up every exposed edge. Shutters: 4 × (2' + 7' + 2' + 7') = 72 ft. Shelf fronts: 6 × 4' = 24 ft. Carcass front edges: 7' + 7' + 8' + 8' + 7' = 37 ft. Total 133 ft, or 40.5 m; with 10% it comes to 44.6 m, so order 45 m in the shutter shade.
Hardware: hinges per shutter depend on shutter height and weight, so follow the hinge maker's chart. This example uses 4 per 7' shutter: 16 hinges, plus 4 handles and one hanging rail.
Consumables: adhesive, screws and nails. Decide whether the carpentry contractor supplies them and write that into the work order, so nobody assumes the other side is buying.
The order list for both wardrobes
Repeat the steps for the Bedroom 2 wardrobe (6' × 7', three shutters, two 3' bays), then combine lines that go to the same vendor in the same specification. Here is the result for both wardrobes: 98 sq.ft of BOQ face becomes eight order lines.
| Item | Unit | Master | Bedroom 2 | Order | Basis |
|---|---|---|---|---|---|
| 18mm BWP ply, make as per BOQ | sheet 8' × 4' | 7 | 5 | 12 | Area + 10%, checked by layout |
| 6mm ply for backs | sheet 8' × 4' | 2 | 2 | 4 | 8' × 7' and 6' × 7' backs, two pieces each |
| 1mm decorative laminate, shade as approved | sheet | 2 | 2 | 4 | Two shutter faces per sheet |
| Liner laminate | sheet | 2 | 2 | 4 | Inside face of each shutter |
| Edge band, to match shutters | m | 40.5 | 32.0 | 80 | 72.5 m + 10%, rounded up |
| Soft-close hinges, make as approved | nos | 16 | 12 | 28 | 4 per 7' shutter (illustrative) |
| Handles | nos | 4 | 3 | 7 | One per shutter |
| Hanging rail | nos | 1 | 1 | 2 | 4' and 3' lengths |
Notice that the edge band is rounded once, on the combined quantity, and the laminate is counted per wardrobe. With seven shutters the combined count is also 4 sheets, but if the two rooms take different shades, each shade is its own line. Keep the "Basis" column in your own sheet: when the dealer questions a quantity, or a carpenter asks for two more sheets, you can show where the number came from.
Step 5: When to order: work back from the day the site needs it
Quantity is half the take-off. The other half is the date. Ordering everything on day one fills a flat with stock the society may not let you store, ties up cash, and exposes laminate to site damage weeks before it is pressed. Ordering on the day it is needed stops the carpenters. Our guide to avoiding project delays covers why materials should be planned as a schedule. This is the arithmetic:
Order-by date = date needed on site − vendor lead time − buffer
| Material | Needed on site | Lead time | Buffer | Order by |
|---|---|---|---|---|
| 18mm and 6mm ply | 1 Dec (carpentry starts) | 4 days | 2 days | 25 Nov |
| Laminate, liner, edge band | 10 Dec (shutter pressing) | 7 days | 2 days | 1 Dec |
| Hinges, handles, rails | 18 Dec (shutter fixing) | 5 days | 2 days | 11 Dec |
The dates and lead times above are illustrative. Ask each vendor for a lead time in writing, and treat special-order shades, imported hardware and stone as the long items that set the pace.
When the scope changes after you have ordered
Clients add a loft, drop a shelf or switch a shade. Re-run the take-off for the changed lines only, then order the difference. Reductions on material that is already on a purchase order need a conversation with the vendor before you agree a lower price with the client. Price each change in rupees and days before anyone builds it; the cost overruns guide covers change orders, receiving deliveries against the order with a GRN, and matching vendor bills before payment.
- Every BOQ line is in one bucket: direct material, assembly, service only, or excluded
- Each assembly has a panel list from the drawing, not from memory
- Ply is counted separately for each thickness, with a stated wastage allowance
- Sheet counts are checked against a cutting layout, especially for 7' and 8' panels
- Decorative laminate, liner and edge band are counted, by shade
- Hinges follow the maker's chart for shutter height and weight
- It is written down who supplies consumables
- Every line has a basis you can show the vendor or carpenter
- Every material has an order-by date worked back from the site schedule
- Shade-dependent items wait for the client's finish approval
Doing this in DecorFlow
In DecorFlow procurement, each BOQ line is classified for purchasing: Material to Order, Custom Assembly, Labor / Service, Excluded, or Needs Review. These are the same four buckets as step 1, plus a review state. Once the client has approved the quotation and the BOQ is locked, Release materials turns the Material to Order lines into material requirements. Custom Assembly lines are held back with a prompt to break them down in the BOQ or reclassify them, because a wardrobe priced per square foot is not something a vendor can supply. DecorFlow does not calculate sheet counts for you: you add the take-off from this article as material requirements with Add Requirement, giving each a trade category, unit, quantity, estimated rate and specification.
From there, Group Requirements into Vendor POs creates purchase orders for a designated vendor with an expected delivery deadline. If the client approves a revised BOQ, releasing again orders only the increase over what was released before, and flags any reduction on an item that is already on a purchase order. Procurement is included in the Starter plan and above. Every new account gets 30 days of Growth features without a credit card, and you can continue on the Free plan afterwards. Vendor bills and payments sit in vendor management, and the BOQ itself in BOQ software.
Related reading: What is a goods receipt note (GRN)?.